
Bubble chandeliers are one of the most flexible lighting styles in modern interiors because they can change character dramatically depending on the glass finish and the layout of the globes. A clear-glass bubble chandelier can feel bright and airy. A frosted version can feel softer and calmer. A clustered composition can feel rich and sculptural, while a linear layout can feel more practical over a dining table or kitchen island. That range is one reason bubble lighting keeps growing in popularity across bedrooms, foyers, living rooms, and dining spaces.
Not every bubble chandelier creates the same effect. Some are designed to spread visual weight evenly across a long table. Others are built to create a cloud-like focal point in the center of a room. Some sit close to the ceiling for tighter spaces, while others drop lower and draw the eye upward. Before narrowing down a specific bubble style, it helps to compare it against the wider range of decorative chandeliers available for modern homes. That broader view makes it easier to see what is unique about glass globe lighting in particular.
What to Compare Before Choosing a Bubble Chandelier
- Glass finish, including clear, frosted, tinted, smoked, or colored glass
- Fixture layout, such as clustered, linear, branching, cascading, or flush mount forms
- Room type, especially dining rooms, bedrooms, foyers, and living spaces
- Ceiling type, including standard-height ceilings and taller entry volumes
- Desired light quality, from sharp sparkle to soft diffusion
- How decorative or minimal you want the fixture to feel when switched off
Why Glass Finish Changes the Entire Look
The glass finish is one of the biggest reasons bubble chandeliers vary so much from one product to the next. Clear glass tends to keep the fixture more open. It lets you see the bulb, the reflections, and the light movement inside each globe. This usually makes the chandelier feel brighter, more reflective, and more decorative from a distance.
Frosted glass does something different. It softens the light, reduces harsh reflections, and makes the chandelier feel more diffused overall. That makes frosted styles useful in bedrooms, softer dining spaces, and interiors where the goal is a calmer atmosphere rather than strong sparkle. Tinted and smoked glass shift the look again by adding mood and contrast. Pink, amber, smoky gray, and darker finishes can make the chandelier feel more expressive even before the light is turned on.
Because the glass finish changes both the daylight appearance and the nighttime lighting effect, this is one of the best ways to narrow down the right bubble chandelier family before focusing on product size or price.
Clear Glass Bubble Chandeliers for Brighter, More Open Rooms
Clear-glass bubble chandeliers are usually the most versatile option because they work in both formal and casual spaces. They reflect more light, feel less visually solid, and can make a room feel brighter without needing a dense metal frame or heavy crystal body. In dining rooms and living rooms, this can help the chandelier stay decorative without making the ceiling feel crowded.
A clear-glass layout often works especially well in interiors with pale walls, lighter upholstery, and modern finishes because the fixture keeps the room feeling open. These chandeliers also suit people who want the bubble effect itself to remain the focus rather than the color of the glass.
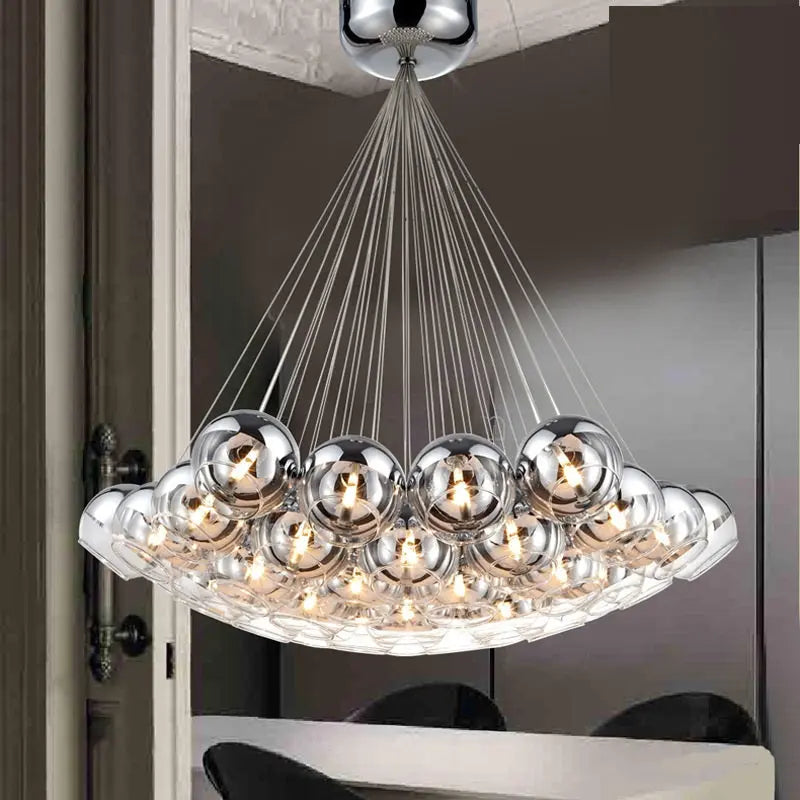
The Quinn Bubble Chandelier Light is a strong example of this clearer, more controlled direction. The globe arrangement keeps the fixture decorative, but the overall structure stays refined enough for modern living rooms, bedrooms, and simpler interiors.
Frosted Bubble Chandeliers for Softer Light and Less Visual Glare
Frosted bubble chandeliers appeal to shoppers who want the bubble form without the sharper shine that clear glass can create. Because the finish softens the bulb visibility and diffuses the light, these chandeliers often feel calmer and more atmospheric. They work especially well in rooms where softer ambient lighting matters more than dramatic sparkle.
Frosted or partly diffused bubble chandeliers are often a better fit in bedrooms, breakfast areas, and softer contemporary interiors. They can also help reduce glare in spaces where the fixture hangs lower or where the room is used for relaxed evening lighting. This is one reason frosted styles are often worth comparing before you default to clear glass.
If you are still deciding which overall family suits your room best, the broader bubble chandelier collection is the easiest place to compare clear, frosted, tinted, clustered, and more architectural versions side by side.
Clustered Bubble Chandeliers for Cloud-Like Volume
Clustered bubble chandeliers are one of the most recognizable versions of the style. They group multiple globes together, often at slightly different heights or in a denser central form, which creates a cloud-like ceiling feature. This layout is especially useful in living rooms, foyers, and dining spaces where the chandelier needs to feel full and sculptural.
Clustered fixtures generally create more decorative presence than linear ones because the eye reads them as a gathered composition instead of a directional fixture. This makes them useful in centered rooms or in open spaces where the chandelier is seen from many angles. In tall foyers, a denser cluster can help fill empty overhead space. In living rooms, it can create a softer focal point than a rigid geometric chandelier.

The Nora Bubble Cluster Chandelier shows this style clearly. Its grouped glass orbs make the chandelier feel richer and more decorative than a simple single-body pendant, while still keeping the overall look lighter than many traditional chandelier forms.
Linear Bubble Chandeliers for Dining Tables and Islands
Linear bubble chandeliers are the most practical option when the room has a clear horizontal anchor, especially a dining table or kitchen island. Instead of building all the visual mass in the middle, the fixture spreads the globes across a longer line. This helps the chandelier follow the furniture footprint and distribute light more evenly over the full surface below.
That is why linear bubble chandeliers are often the best choice in dining rooms. A long table usually looks more intentional with a directional fixture above it than with a compact round chandelier that leaves the ends visually unsupported. Linear bubble fixtures can still feel decorative, but they solve a more practical room-shape problem at the same time.
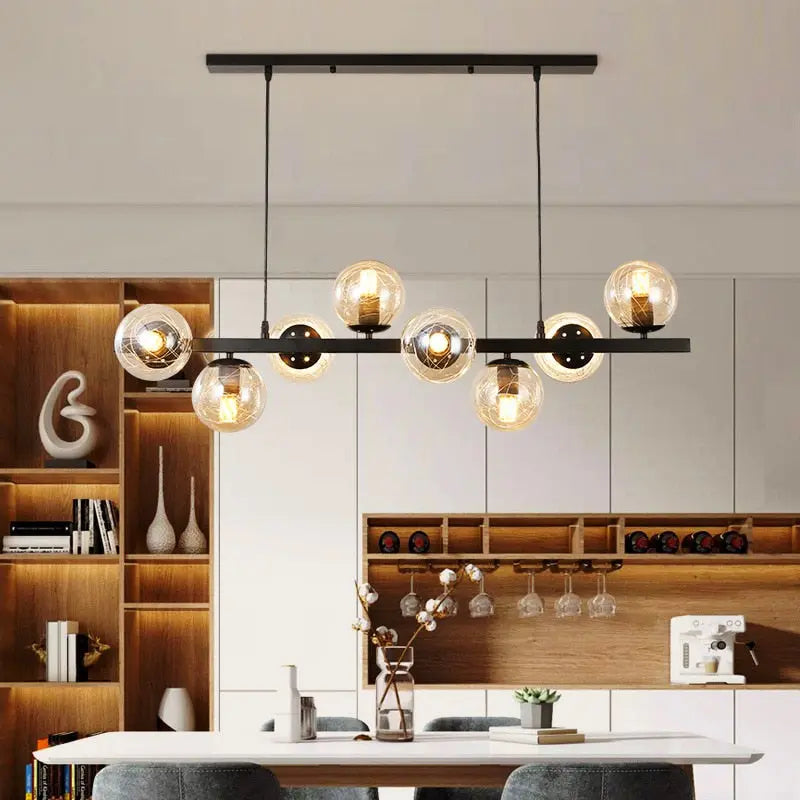
The Modern Bubble Chandelier for Dining Room is a strong example of this layout. The globe placement gives the fixture the softness of bubble lighting, but the overall structure keeps it aligned with a dining table rather than letting it float as a central cluster.
Sputnik and Branching Bubble Chandeliers for Stronger Structure
Some bubble chandeliers rely on branching or sputnik-style arms to create more visible structure. These designs often suit modern interiors that want the softness of globe lighting but still need the chandelier to feel architectural. Compared with a compact cluster, a sputnik layout creates more movement across the ceiling and usually feels more energetic from a distance.
This style is especially useful in living rooms, open-plan spaces, and interiors with cleaner furniture lines where the ceiling needs a stronger visible framework. Because the globes sit on more extended arms, the chandelier can feel larger without becoming visually dense in the center.

The Laura Bubble Sputnik Chandelier is a strong reference point here because it keeps the bubble-glass look while giving the fixture more directional energy and stronger structural definition.
Cascading Bubble Chandeliers for Taller Spaces
Cascading bubble chandeliers work best when the room benefits from visible vertical movement. In foyers, stairwells, and taller open spaces, this layout helps guide the eye upward and gives the chandelier a more dramatic relationship with ceiling height. Instead of reading as one central mass, the globes fall in a composition that feels more layered and vertical.
These are often among the best choices for taller entries because they make the chandelier feel custom to the architecture rather than simply scaled up. In rooms with standard ceilings, though, a full cascade can feel too deep unless the fixture is carefully sized. That is why this layout is strongest when the room has enough height to let the chandelier breathe.

The Contemporary Bubble Cascade Chandelier shows how this layout can create upward movement and a more dramatic entry statement without relying on heavy metal framing.
Flush Mount Bubble Chandeliers for Lower Ceilings
Flush mount and close-to-ceiling bubble chandeliers solve a different problem. In standard-height foyers, bedrooms, and lower-ceiling rooms, a long-drop chandelier can make the ceiling feel compressed or create clearance issues. A flush-mount bubble design keeps the globe look but places it much closer to the ceiling plane, which preserves headroom while still giving the room decorative character.
This is often the strongest bubble option for compact rooms that still need more presence than a basic flush light can offer. It is also a useful solution for shoppers who like bubble glass but do not have the ceiling height to support a cluster or cascade.

Colored Bubble Chandeliers for More Personality
Colored bubble chandeliers bring a different kind of impact. Instead of relying only on the arrangement of the globes, they make color part of the fixture identity. This makes them especially effective in bedrooms, creative spaces, and interiors that need a more expressive focal point. Pink, amber, smoky, and darker glass finishes can all shift the mood of the room even when the light is off.
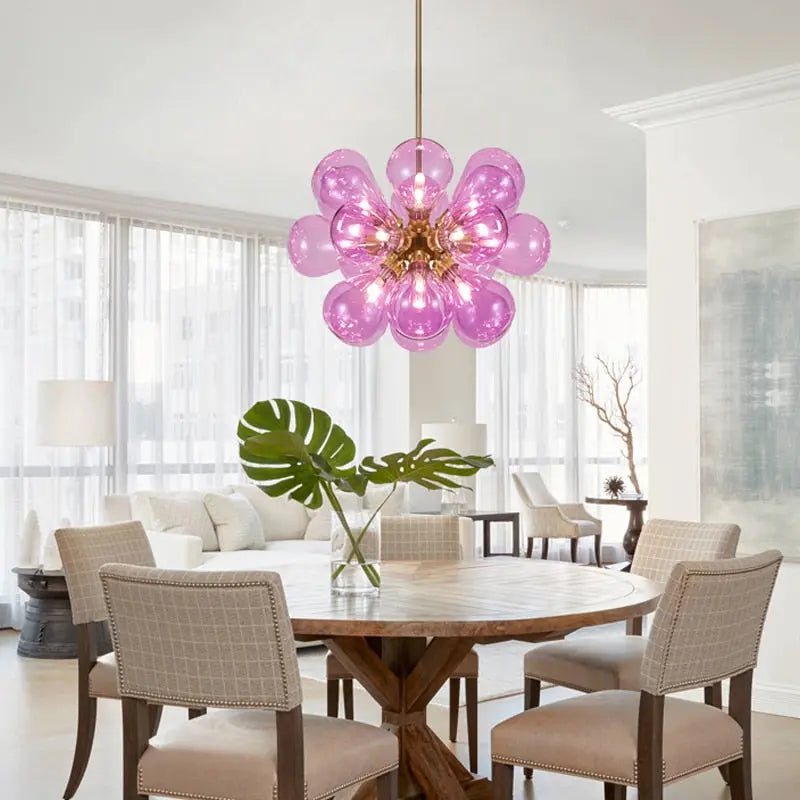
The Nadine Pink Bubble Chandelier is a good example of how color can become part of the chandelier’s role in the room. It keeps the recognizable bubble form, but the pink glass changes the entire tone from neutral decorative lighting to something more expressive and memorable.
How to Narrow Down the Right Bubble Chandelier
Once you know which finish and layout direction you prefer, the next step is making sure the chandelier fits the room properly. Room size, ceiling height, furniture footprint, and desired light quality still matter. A large cluster may be perfect in an open living room but feel too crowded above a smaller breakfast table. A linear bubble chandelier may solve a dining room beautifully but feel too directional in a centered foyer.
That is also why sizing should still be part of the decision even after the style family is clear. If sizing is your main open question, the best follow-up read is still the bubble chandelier size guide, because getting the proportions right is what turns a beautiful fixture into one that actually works in the room.
Closing Thoughts
The strongest bubble chandelier choice usually starts with the glass finish and layout, not with the product photo alone. Clear glass, frosted glass, colored globes, clustered layouts, linear forms, branching arms, flush-mount profiles, and cascading drops all solve different visual problems. Once you match the right bubble family to the room, the rest of the decision becomes much easier.
This is why bubble chandeliers remain such a strong category for modern homes. They offer enough range to feel decorative, practical, soft, expressive, or architectural depending on the exact version you choose. Used well, they give a room both light and character without forcing it into a heavier chandelier style.


