

Key Takeaways
| Question | Answer |
|---|---|
| Three layers? | Step lights at tread level · wall lights along the run · landing/overhead fixtures at turns and the top. |
| Step light spacing? | Every step for the most even light; every other step on most home stairs; every third on a low-traffic stair. |
| Wall light height and spacing? | About 66 in above the line of the tread nosings, 8–10 ft apart along the run. |
| Switching? | Three-way switches at the top and bottom of every stair; sensors or low-level step lights for night use. |
| Color and glare? | 2700–3000K; shielded or downward fixtures; no bare bulb visible to someone walking down. |
| Where does the chandelier fit? | It lights the stairwell void, not the treads — add step or wall lights even with a chandelier. |
Quick Facts
- Falls happen most on the middle treads and the first and last steps — light the whole run evenly, not just the ends.
- Step lights are low-output (roughly 20–100 lm each); their job is contrast on the tread edge, not room light.
- Most US jurisdictions adopt the International Residential Code, which requires stair illumination and switching at each floor level — confirm with local code.
- Downward-shielded step lights avoid glare; a light aimed up a stair blinds people walking down.
- Plug-in or battery LED step lights with motion sensors work where wiring is impractical.
- Landing fixtures: flush or semi-flush, 1,200–2,000 lm, centered over the landing.
Why Stairs Need Their Own Lighting
A stair asks more of light than a room does. The eye has to read each tread edge against the next, going up and coming down, often while carrying something, and a single overhead light behind you casts your own shadow onto the steps ahead. The result is that a stair lit only by a ceiling fixture at the top is brightest where it is least needed and darkest in the middle of the run. Even a stairwell with a large chandelier usually has this problem, because the chandelier hangs in the open well beside the stair and lights the void rather than the treads. The fix is to bring light down to tread level and along the run — which is what step and wall lights are for. For the lumen arithmetic, see understanding lumens and lighting for staircases; this guide is about which fixtures go where.
The Three Layers of Stair Lighting
Layer 1: step and tread lights
Small recessed or surface fixtures set into the stair wall just above the treads — usually 8 to 12 inches above the tread surface — or into the riser itself. They throw a low, shielded wash across the tread so its edge reads clearly against the next, which is exactly what the eye needs on the way down. Spacing is a choice of evenness against cost: a light on every step gives the most uniform result and suits open or floating stairs; every other step is the usual home layout; every third step works on a low-traffic secondary stair. Because each one is low output, step lights can stay on at night as a guide without lighting the house.
Layer 2: wall lights along the run
Sconces mounted on the stair wall, following the rake of the stair at a constant height — about 66 inches above the line connecting the tread nosings — and spaced 8 to 10 feet apart. They light the treads from above and to the side, so the walker's shadow falls away from the steps, and they light the wall itself, which makes a narrow stairwell feel wider. On a stair with a handrail on the wall side, keep projection under about 4 inches so the fixture never meets a hand or a shoulder; up-and-down double-head fixtures or shielded discs work well. Mounting heights for every room are in the wall sconce height guide.
Layer 3: landing and overhead fixtures
A flush or semi-flush fixture centered over each landing and over the top of the stair, where the direction changes and people pause. Plan 1,200 to 2,000 lumens for a landing fixture and keep 7 feet of clearance under anything that hangs. In a two-story stairwell, a chandelier in the open well is the fourth, decorative layer — it fills the void and reads from the entry, but it does not replace the three above. Landing fixtures are covered in modern hallway ceiling lights; stairwell chandeliers in long chandeliers for staircases and high ceilings.
| Fixture | Where | Height / spacing | Output | Job |
|---|---|---|---|---|
| Step light (wall) | Stair wall beside treads | 8–12 in above tread; every 1–3 steps | ~20–100 lm each | Tread-edge contrast, night guide |
| Riser light | Set into the riser | Every step or every other | Low | Same as step light; suits open stairs |
| Wall light | Stair wall | ~66 in above tread line; 8–10 ft apart | 400–1,000 lm each | General stair light, wall wash |
| Landing fixture | Ceiling over landing / top | Centered; 7 ft clearance | 1,200–2,000 lm | Turns, pauses, top step |
| Stairwell chandelier | Open well | Body at or above second-floor line | 2,000–4,000 lm | Ambient and decorative; not tread light |
Spacing by Stair Type
| Stair | Step lights | Wall lights | Overhead |
|---|---|---|---|
| Straight run, enclosed (walls both sides) | Every other step, one side | 1–2 along the run on one wall | Top and bottom |
| Straight run, open one side | Every other step on the wall side | 1–2 on the wall side | Top; chandelier in the well optional |
| L-shaped with landing | Every other step on both flights | One per flight | Landing fixture + top |
| U-shaped / switchback | Every other step, inner or outer wall | One per flight, one at landing | Landing fixture + top |
| Open or floating treads | Every step, or LED under each tread | Optional | Top |
| Basement stair | Every other step | One mid-run | Top and bottom, three-way switched |
Switching, Sensors, and Night Light
A stair must be lit from where you start, not where you finish, so switch it from both ends with three-way switches; the International Residential Code, which most U.S. jurisdictions adopt, requires stair lighting and switching at each floor level, so confirm the specifics with local code before a renovation. Motion sensors at the top and bottom are the convenient alternative, especially on basement stairs and for people carrying laundry. For night use, put step lights on their own circuit at a low level or a timer, so the stair is always readable without turning on the wall lights; plug-in and battery step lights with motion sensors do the same job where wiring is impractical. Dimmers should be LED-rated and matched to the driver type on the product page.
Glare, Direction, and Color
The person most at risk on a stair is the one coming down, so glare matters more than brightness. Choose step lights with a downward louver or a shielded face, so the tread is lit and the source is hidden; avoid any bare bulb or bright lens at eye level on the way down, and never aim a fixture up the stair. Wall lights should be diffused or directed up and down rather than out. Keep color at 2700–3000K, the same as the hallways at top and bottom, so the stair does not read as a different, colder zone; many integrated LED step and wall lights come in a 6000K version — choose or set the warm one. Contrast between tread and riser helps too: a light tread nosing or a contrasting stripe makes edges readable at lower light levels.
Installing Stair Lights
Hardwired step lights are easiest during construction or a stair renovation, when the wall is open and boxes can go in at tread height on a dedicated circuit; in a finished wall it is an electrician's job of fishing wire between studs. Wall lights along the run usually need new boxes too. Plug-in strips, battery step lights, and motion-sensor pucks need no wiring and suit rentals and basement stairs. Landing fixtures typically use an existing ceiling box. On the wiring side, step lights are usually low-voltage LED on a driver, so the driver location and the dimmer type need planning. For retrofit options without new wiring, see installing wall lights in old homes with limited wiring.
Quick decision: lighting your stair
Any stair: three-way switches at top and bottom • Most homes: step lights every other step + one wall light per flight + a landing fixture • Open or floating stair: step or under-tread light on every step • Narrow enclosed stair: slim wall lights under 4 in projection • No wiring: battery or plug-in motion step lights • Two-story stairwell: all of the above plus a chandelier in the well • Always: shielded fixtures, 2700–3000K, nothing bright in the eye line going down.
Stair Lights by Layer
Six fixtures for the three layers — step lights, wall lights along the run, and landing fixtures.
Step lights
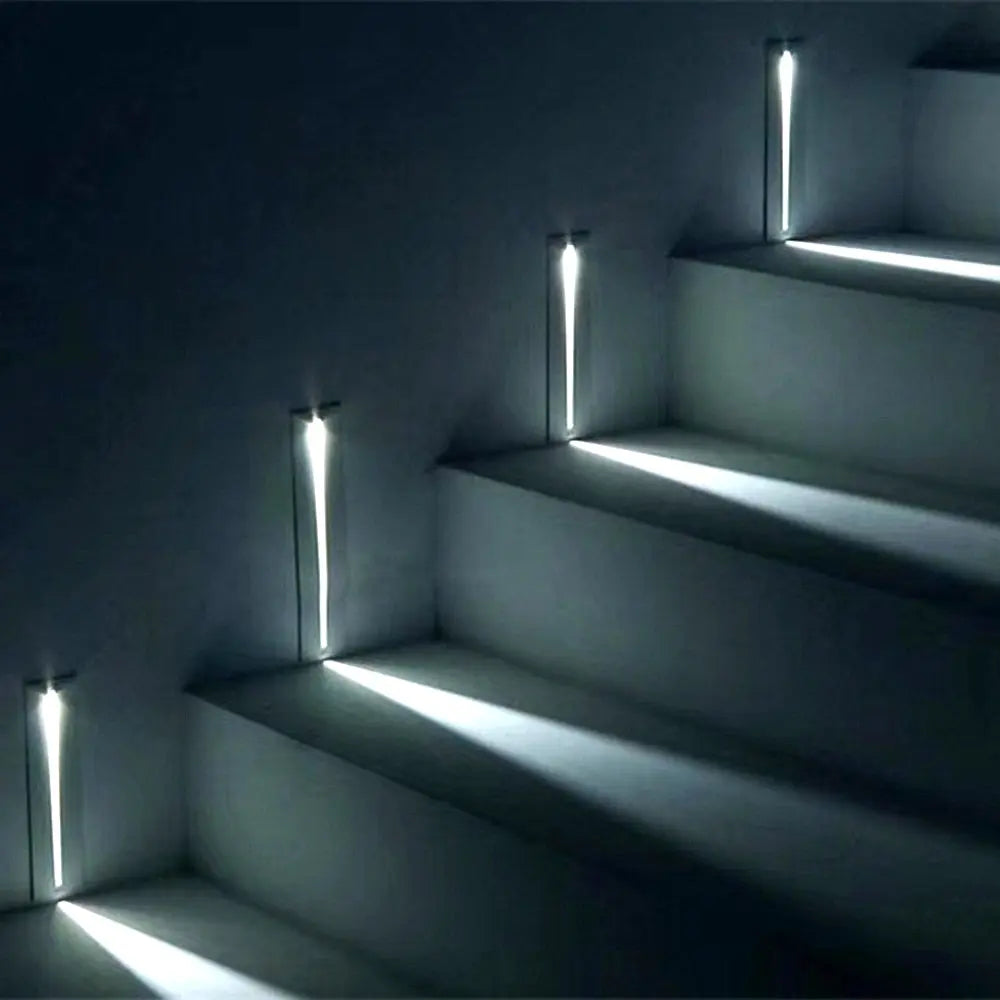
The LED Lights for Staircase Wall, in black, white, or silver, are low, shielded LED step lights for the wall beside the treads — the tread-level layer that lights where feet land, spaced every one to three steps and switched from both ends or on a sensor.
Wall lights along the run

The Double Head LED Wall Light throws light up and down from a slim body — on a stair wall it lights the treads below and the ceiling above without projecting into the handrail zone. Space them 8 to 10 feet apart along the rake.

The Yumi Modern Round Wall Light is a shallow round disc with a diffused face — glare-free at eye level, which is what a stair wall light needs for people coming down. A good choice for narrow enclosed stairs.

The Momo LED Wall Lamp, in black or white, is a compact LED wall light for the run of a modern stair; choose the warm-white version to match the hallways at top and bottom.
Landing and top-of-stair fixtures

The Nelis Modern Smart LED Flush Mount Ceiling Light is the landing fixture for an 8-foot ceiling: a shallow integrated-LED disc with app and remote control, so it can be scheduled or dimmed for night use while keeping full headroom over the turn.

The Anya Modern Bubble Glass Flush Mount Light, in milk-white glass with gold or black, is the decorative landing fixture — a flush cluster that lights the turn and the top tread and reads as a designed piece from below.
Step lights, stair wall lights, landing fixtures, and stairwell chandeliers.
Wall Lights Staircase Lights Ceiling Lights Staircase Chandeliers
Frequently Asked Questions
What is the best way to light indoor stairs?
Use three layers: step lights at tread level, wall lights along the run, and a fixture over each landing and the top. Switch the stair from both ends and keep every fixture shielded and warm white.
How far apart should stair step lights be?
On every step for the most even light, every other step on most home stairs, or every third step on a low-traffic stair. Mount them 8 to 12 inches above the tread surface.
How high should wall lights be on a staircase?
About 66 inches above the line connecting the tread nosings, following the slope of the stair, and 8 to 10 feet apart along the run.
Do stairs need a light switch at the top and bottom?
Yes in practice and usually by code — most U.S. jurisdictions adopt the International Residential Code, which requires stair lighting and switching at each floor level. Use three-way switches or motion sensors; check local code for specifics.
Is a stairwell chandelier enough to light the stairs?
No. A chandelier in the open well lights the void and reads from the entry, but it rarely lights the treads evenly. Add step lights or wall lights along the run.
What color temperature should stair lights be?
2700K to 3000K, matching the hallways at the top and bottom so the stair does not read as a colder zone. Avoid 6000K step lights in living areas.
How do I avoid glare on stair lights?
Choose shielded or louvered step lights that point down, diffused wall lights, and nothing with a bare bulb in the eye line of someone walking down. Never aim lights up the stair.
Can I add stair lights without wiring?
Yes. Battery or plug-in LED step lights with motion sensors, and plug-in wall lights, work without new wiring and suit rentals and basement stairs.
How bright should stair lighting be?
Bright enough that every tread edge is clearly readable from top and bottom. Step lights are low output (about 20–100 lumens each); wall lights add 400–1,000 lumens each; a landing fixture 1,200–2,000.
Should stair lights stay on at night?
Low-level step lights on a timer, a separate dim circuit, or motion sensors make night trips safer without lighting the house.
Planning Your Stair Lighting
Stand at the top of the stair at night with only the existing lights on and look at the middle treads: if their edges are hard to read, the stair needs a lower layer. Add step lights first, wall lights second, and landing fixtures at every turn, switch it all from both ends, and the stair becomes the safest part of the house rather than the darkest.
Browse step and stair lights in the staircase lights collection and the wall lights collection, landing fixtures in ceiling lights, and stairwell chandeliers in staircase chandeliers. For the lumen math, read understanding lumens and lighting for staircases; for spiral fixtures in the well, spiral chandeliers for staircases.


