I'll never forget the first time I stood beneath my grandmother's crystal chandelier after she'd cleaned it. The afternoon sun caught those crystals, and suddenly, the entire dining room transformed into something magical. Rainbow prisms danced across the walls, and I thought, This is what lighting should do.
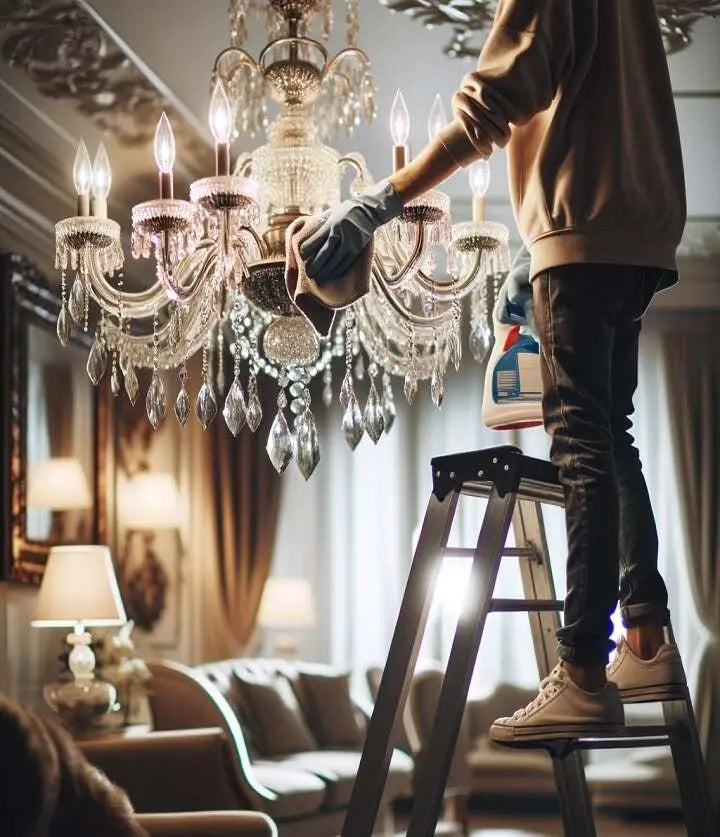
Fast forward twenty years, and I'm standing on a ladder in my own foyer, staring up at a once-gorgeous chandelier that's lost its sparkle. Dust had settled into every crevice, water spots clouded the glass, and honestly? The fixture looked more gray than glittering. That's when I learned that even the most stunning crystal chandelier needs regular care to maintain its brilliance.
Here's the thing about chandelier cleaning: it's not complicated, but it does require the right approach. Rush it, and you risk damaging delicate crystals or leaving streak marks. Skip it too long, and layers of grime build up until your $2,000 investment looks like a $200 afterthought.
In this guide, I'll walk you through three proven methods to clean a chandelier, from quick spray-and-go techniques to deep-cleaning strategies that restore original sparkle. Whether you've got a modern bubble chandelier in your kitchen or an ornate crystal piece hanging above your dining room table, you'll learn the safest, most effective way to clean without taking anything apart (unless you want to).
Ready to bring back that showroom shine? Let's get started.
Why Regular Chandelier Cleaning Actually Matters
Beyond aesthetics (though let's be honest, that's reason enough), a dirty chandelier affects your home's lighting quality. Dust and grime on crystal surfaces can reduce light output by up to 30%. That means you're paying for electricity to power a fixture that's only delivering 70% of its potential brightness.
I discovered this the hard way when I installed dimmable LEDs in my dining room chandelier and couldn't figure out why the space still felt dark. The culprit? Months of accumulated dust coating every crystal. One thorough cleaning later, and suddenly I could actually see my dinner guests' faces across the table. If you're struggling with choosing the right dining room lighting for your space, proper maintenance is just as crucial as the initial fixture selection.
Regular cleanings also preserve your investment. Crystal chandeliers can last generations, but neglect leads to permanent water spots, oxidation on metal parts, and crystal cloudiness that no amount of scrubbing will fix. Think of cleaning as preventative maintenance that protects both beauty and value.
Plus, there's something deeply satisfying about watching a chandelier transform from dull to dazzling. Trust me on this one.
What You'll Need Before You Start

Gather these supplies before you climb that ladder:
For the Spray Method
- Commercial chandelier cleaner (or DIY solution: 1 part isopropyl alcohol to distilled water)
- Spray bottle
- Drop cloth or old towels
- Ladder (stable and tall enough)
- White gloves (optional but recommended)
For Hand Cleaning
- Microfiber cloth (several)
- Mild dish soap
- Warm water
- Two buckets or bowls
- Lint-free towels
- Feather duster
- Cotton gloves
Safety Essentials
- Turn off the wall switch to prevent electrical issues
- Wait 5-10 minutes for bulbs to cool completely
- Protect your furniture with a drop cloth
- Have someone spot you on the ladder
Pro tip: Distilled water prevents water spots that tap water leaves behind. It costs maybe $2 extra and saves you from rewashing everything. And if you're wondering about understanding different light bulb types before you remove them for cleaning, that's worth a quick read to avoid breaking expensive specialty bulbs.
Method 1: The Spray & Drip Method (Fastest Option)
This is my go-to for monthly touch-ups, and it's genuinely the easiest way to clean a chandelier without disassembly.

Step 1: Prepare the Area
Spread drop cloths under and around the chandelier. I once skipped this step and spent an hour cleaning cleaning solution off my dining room table. Learn from my mistake.
Step 2: Dust First
Use a feather duster or microfiber cloth to remove loose dust. Work from top to bottom so debris falls away from already-cleaned areas. This prevents turning dust into mud when you spray.
Step 3: Spray Generously
Hold your spray bottle 6-8 inches from the chandelier. Coat the crystals thoroughly with chandelier cleaner until the solution begins to drip. Don't be shy here—you want enough liquid to dissolve grime as it runs off.
The magic happens when you let it drip dry. The cleaning solution carries dirt and dust away as it evaporates, leaving crystals shiny and clean without any wiping required.
Step 4: Let It Work
Walk away for 15-20 minutes. Seriously. Grab coffee, check your email, resist the urge to touch anything. The formula needs time to air dry completely.
When I cleaned my bubble chandelier using this method last month, I was skeptical about the "no-wipe" promise. But watching those amber glass globes transform from dingy to gleaming without touching a single piece? Magic. If you're curious about choosing the perfect bubble chandelier size for your space, proper maintenance keeps whatever size you select looking spectacular.
Best For: Regular maintenance cleanings, fixtures with intricate designs where hand-cleaning is impractical, anyone who wants quick results.
Limitations: Won't remove heavy build-up or stubborn grime. For that, you need a more hands-on approach.
Method 2: Crystal-by-Crystal Hand Cleaning
This method delivers the most thorough results and gives you control over every surface. It takes longer, but the sparkle payoff is worth it. Before you start removing crystals, it's worth reviewing how to safely hang a chandelier so you understand the fixture's construction and won't accidentally disturb mounting hardware during cleaning.

Prep Your Cleaning Solution
Mix warm water with a few drops of mild dish soap in one bucket. Fill a second bucket with clean warm water for rinsing. I prefer adding 1 tablespoon of white vinegar to the rinse water—it cuts through any soap residue and prevents water spots.
Remove Crystals Strategically
Here's a trick that saved me hours of frustration: before removing any hanging glass pieces, take a photo of the chandelier. Better yet, place a piece of tape on each hook as you remove crystals, numbering them so you know exactly where each ornament belongs.
Start at the bottom tier and work your way up. Gently unhook each crystal and set it aside on a towel. Some fixtures use pins instead of hooks—these require careful wiggling to release without bending the wire.
Clean Each Piece Individually
Dip crystals in soapy water, then use a microfiber cloth to wipe away grime. For stubborn spots, let pieces soak for 2-3 minutes before scrubbing gently. Rinse thoroughly in your second bucket, then dry immediately with a lint-free towel.
Never let crystals air dry after rinsing—that's how you get water spots. I learned this after washing an entire chandelier's worth of crystals, only to have them covered in cloudy mineral deposits. Had to rewash everything.
Clean the Frame
While crystals dry, wipe down metal parts with a damp cloth. Avoid getting electrical components wet. For tarnished brass or silver frames, use appropriate metal polish, working carefully around wiring.
Reassemble with Care
Follow your photos to rehang each crystal in its original position. This ensures the chandelier maintains its intended light refraction pattern. If you're working with a particularly elaborate design, our step-by-step guide to cleaning a chandelier includes additional reassembly tips for complex fixtures.
Best For: Annual deep cleaning, antique chandeliers requiring gentle handling, fixtures with heavy grime accumulation.
Time Investment: 2-4 hours depending on size. Worth every minute for that showroom sparkle.
Method 3: Full Removal & Soak
For seriously grimy crystal chandeliers that haven't been cleaned in years (we've all been there), sometimes you need to bring out the big guns.
When to Use This Method
- Crystals have visible build-up that spray won't touch
- You're seeing permanent-looking cloudiness
- The chandelier hasn't been cleaned in multiple years
- You're dealing with kitchen grease accumulation on a dining room chandelier
The Process
Remove all crystals and place them in a basin filled with warm water and ammonia-free glass cleaner (or that vinegar solution I mentioned earlier). Let them soak for 10-15 minutes while grime loosens.
After soaking, swish crystals gently in the cleaning solution, rinse in distilled water, and dry immediately with lint-free cloths. The soak does most of the work, making even the grimiest pieces easy to clean.
I used this method on a vintage crystal chandelier I bought at an estate sale. The crystals looked beyond hope—clouded and yellowed from decades of neglect. After a good soak and careful drying, they sparkled like new. Turns out they weren't damaged at all, just really, really dirty. For more insights on choosing crystal chandeliers, quality construction often means easier long-term maintenance.

Safety Note: Never use ammonia-based cleaners (like Windex) on your chandelier frame or electrical components. Ammonia can damage finishes and shouldn't be used near wiring.
Cleaning Different Chandelier Types
Not all chandeliers are created equal, and cleaning approaches vary by design.
Glass Chandeliers

Modern glass chandeliers with smooth surfaces are the easiest to clean. A simple wipe with glass cleaner and a microfiber cloth often does the trick. For bubble or globe designs, the spray method works beautifully since there aren't many nooks for dust to hide. Learn more about how to clean a glass chandelier for specific techniques that work best on non-crystal fixtures.
Crystal Chandeliers

Traditional crystal pieces with cut facets require more attention. Those intricate edges catch light beautifully but also trap dust effectively. Hand-cleaning or the soak method ensures you reach every crevice. Our dedicated guide on how to clean crystal chandelier fixtures covers additional restoration techniques for high-end pieces.
Branch Chandeliers

Branch-style chandeliers with organic, sculptural designs need careful dusting. Use a soft brush to reach between branches, then spot-clean with a damp cloth. The spray method can work, but watch out for solution pooling in hollow areas. If you're considering this style, check out our complete guide to rustic chandeliers to understand maintenance needs before purchasing.
Black Chandeliers

Black metal chandeliers show dust more prominently than other finishes. Regular dusting (weekly if you're in a dusty climate) prevents visible build-up. Use only water-dampened cloths on black finishes—many cleaners leave visible residue.
I have a matte black dining room chandelier, and I swear it looks dusty five minutes after cleaning. My solution? A microfiber duster twice a week keeps it looking sharp between deep cleanings. For more tips, our article on how to choose the best black chandelier includes finish-specific maintenance recommendations.
Pro Tips That Actually Work
The Rotate Strategy
When cleaning fixtures with multiple tiers, rotate the chandelier lightly (if it's on a chain or has a swivel) rather than walking around it repeatedly. Less ladder movement means less opportunity to knock something loose.
Glove Up
Wearing white cotton gloves while handling crystals prevents fingerprint smudges and gives you better grip on slippery glass. I resisted this tip for years, thinking it was fussy. Then I tried it and immediately understood why professionals swear by it.
Temperature Matters
Clean when crystals are at room temperature. Hot bulbs + cold cleaning solution = potential cracking. Always turn off fixtures and wait at least 10 minutes before starting.
Document Everything
Before any disassembly, take multiple photos from different angles. When you're staring at 47 loose crystals wondering where each one goes, you'll thank yourself for this step.
Test First
Before dousing your entire chandelier in any cleaning solution, test it on one inconspicuous crystal. Some antique glass can react poorly to certain chemicals.
Common Mistakes to Avoid
Using Paper Towels
Paper towels might seem convenient, but they leave lint and can scratch delicate crystal surfaces. Microfiber cloths cost maybe $10 for a pack and last years. Worth it.
Cleaning Top to Bottom… Sort Of
Yes, work from top to bottom, but here's the nuance: when wiping, start at the bottom of each crystal and work up. This prevents dirty solution from dripping onto just-cleaned surfaces.
Over-Spraying
More cleaning solution doesn't mean cleaner results. It means longer drying times and potential drips on furniture. A thorough misting is enough—you're not trying to douse the fixture.
Rushing the Drying Process
This is the number one cause of water spots and streaks. Whether you're using the spray method or hand-washing, patience during drying makes all the difference.
Ignoring the Ceiling Canopy
Don't forget to dust and wipe the ceiling-mounted canopy that houses your chandelier's electrical connections. It collects dust too and can ruin the overall clean look if neglected.
When I first started cleaning chandeliers, I made every single one of these mistakes. My "clean" fixtures had streaks, water spots, and somehow more visible dust than before I started. Learning the right techniques transformed the results—and cut my cleaning time in half. If you're dealing with particularly tricky installations, check out common mistakes when installing staircase chandeliers—many of those lessons apply to maintenance too.
How Often Should You Clean Your Chandelier?
Monthly: Light dusting with a feather duster (5 minutes)
Quarterly: Spray and drip method for maintenance (20 minutes)
Annually: Full hand-cleaning or crystal removal method (2-4 hours)
This schedule keeps crystals sparkling and prevents heavy grime accumulation. Adjust based on your environment—if you live somewhere dusty or have an open kitchen near your dining room chandelier, you might need more frequent attention.

My foyer chandelier sits directly above the front door. Between desert dust and four kids tracking in who-knows-what, it needs monthly spray cleanings to stay presentable. Meanwhile, the bedroom fixture gets quarterly attention and looks perfect. For more guidance on choosing the right foyer chandelier, consider how location affects maintenance requirements.
Location matters. Consider your specific circumstances and settle on a rhythm that maintains sparkle without feeling overwhelming. Our essential guide to foyer lighting maintenance breaks down room-specific cleaning schedules that actually work.
Special Considerations for High-Ceiling Installations
If your chandelier hangs in a two-story foyer or above a staircase, cleaning becomes more challenging—but not impossible. Safety is paramount when working at height, and sometimes calling in professionals makes sense.
For staircase chandeliers, invest in an extension ladder with proper stabilization. Never lean or stretch beyond your comfort zone. The spray method becomes particularly valuable here since it eliminates the need to reach every individual crystal. I've found that quarterly spray cleanings plus one annual professional deep-clean keeps high installations looking pristine without unnecessary risk.
If you're planning a chandelier installation in a high-ceiling space, read our guide on how high should a staircase chandelier be to ensure proper placement that considers future maintenance access.
Ready to Restore That Showroom Shine?
A sparkling chandelier transforms more than just light quality—it elevates your entire space. That first time you flip the switch after a thorough cleaning? There's nothing quite like watching light refract through pristine crystals, casting rainbows across your walls and reminding you why you fell in love with that fixture in the first place.
Whether you choose the quick spray method for regular touch-ups or commit to the full crystal-by-crystal deep clean, the key is consistency. A chandelier properly maintained becomes a lasting focal point that only grows more stunning with time.
Start with the method that fits your schedule and chandelier type. Set a reminder for your next cleaning (seriously, do it now—future you will be grateful). And remember: every piece of glass you wipe clean is an investment in your home's beauty and your fixture's longevity.
Browse our complete chandelier collection to find your next statement piece, or explore our comprehensive chandelier care guide for more expert tips on maintaining your fixtures. Looking for something specific? Our 10 best crystal chandeliers guide showcases top picks that combine stunning design with easy maintenance.
Have questions about cleaning a specific chandelier style? Drop us a message—we love helping customers keep their lighting looking flawless.